
One of the great things about Google Forms is that the information submitted through the form is populated in a spreadsheet. All the data in one location, easily sortable. You can even share the spreadsheet with others so they can see and use the information.
But as great as spreadsheets are, somethings they can be a little overwhelming to view, especially if they are filled with many fields containing a lot of information. What if you wanted each form response recorded in a separate, well-organized document, a document that could automatically be created and saved in your Google Drive as well as sent to the person who submitted the form? Enter the free Google Sheets add-on autoCrat. As I wrote in a previous post, my teachers use two Google Forms to submit their agendas for and notes from their weekly Professional Learning Community (PLC) meetings. With autoCrat, not only will I receive the submitted information in the forms' corresponding spreadsheets, but now both the teachers and I will receive the agendas and notes in separate, printable, easy-to-ready documents. To see exactly how to use autoCrat and how it can take your Google Forms and Sheets to the next level, watch the tutorial below. Hope it's helpful!
0 Comments

I love Google Forms. As an elementary school principal, I use them all the time. All. The. Time. From a parent contact log to gathering staff meeting feedback to finding out which parents are interested in joining our PTA Board, I use Google forms on a daily basis. If you're not already familiar with this powerful tool, check out this series of tutorial videos on what has become my favorite online tool.
The great thing about a Google Form is that the data gathered from the form is neatly organized in a Google Spreadsheet (A.K.A. Google Sheet) that can then be sorted and/or filtered. Last year I created two new Google Forms my teachers could use to submit their agendas and notes from their weekly Professional Learning Community (PLC) meetings. My goal was to provide teachers an easy-to-use method of submitting their grade level's agenda and notes while providing me a central location for all their responses. It worked great. I had one form and corresponding spreadsheet for their PLC agendas and one form and spreadsheet for their PLC notes. Each week, I could sort the responses by grade level to see what each team was working on. The problem came as the year progressed. With each passing week, more and more responses populated each spreadsheet. While I was able to sort the data by grade level, I still had to do a lot of scrolling due to the growing number of responses and large amount of text in some of the fields. What I needed was a way to filter the data for each grade level into a different worksheet (or tab) within the same spreadsheet. That's when I discovered EZ Query. EZ Query is a free add-on for Google Sheets that enables you to create different worksheets (tabs) within one spreadsheet that show only the data you want. This easy-to-use add-on makes the already-amazing Google Forms/Sheets combination even better. Rather than write about how it works, allow me to show you in the short video below. Enjoy!  He still uses PowerPoint? Whoa. He still uses PowerPoint? Whoa. In two days I’ll be heading to Palm Springs to attend the annual Computer-Using Educators (CUE) Conference. I always look forward to mid-March and the opportunity to travel to the desert to be among other like-minded educators who come to learn about cutting-edge technologies and strategies to increase student learning through the use of educational technology. And if past events are any indication, while I’m at the conference this year I will hear, at least once, someone say something like “You still use PowerPoint?” (said with incredulity and rolling eyes) or “I can’t believe anyone still uses PowerPoint.” Well, I have a confession to make. I still use PowerPoint. <gasp> What?! You still use PowerPoint, Brent? Yep. I still use PowerPoint, and here’s why – because sometimes PowerPoint is still the most appropriate tool for the job, just like good old-fashioned paper and pencil are sometimes the best tools for the job. Now don’t get me wrong. I don’t use PowerPoint for everything. I believe PowerPoint can be overused and misused, that “death by PowerPoint” is much too common. I agree that using a presentation with a bunch of slides filled with too much text is not a great way to increase student (or staff) engagement and therefore maximize learning. But there are times when a PowerPoint (or Keynote) presentation can help get the job done, especially when you embed video and/or other engaging elements into the presentation. What about Prezi? Many would say Prezi is way more visually appealing than PowerPoint, and I would agree. But the question that needs to be asked is this – What are you trying to achieve in your presentation? Yes, Prezi is very flashy, and I think it’s a pretty slick presentation tool. But one must be careful not to overshadow a presentation’s content with its packaging. A few years ago I attended a church that, for a time, used Prezi to display the lyrics to the songs we sang during worship. Did those lyrics look cool up on the big screen? You bet. Words were spinning in and out, changing color with each verse. It was very impressive. The problem? I frequently found myself paying more attention to trying to guess what the next transition effect was going to be than focusing on what the words of the song were saying, on worshiping Jesus. The flashy method of delivery took away from the content. It was distracting. In the right situation, I think Prezi can be the perfect tool. There are so many great presentation tools out there like Prezi, Haiku Deck, Keynote, and Google Slides, each with its strengths. But my point is this – the task should always determine the tool. Putting up a new fence in your backyard? A hammer is a great tool for the job. But it’s not the right tool for every home improvement project. One size doesn’t fit all, in home improvement as well as technology. Rather than demonizing PowerPoint, dismissing it as an archaic tool, let’s remember that for some, creating a PowerPoint presentation is a giant step forward in integrating technology in the classroom. We’re all at different points along the spectrum of technology use in education. Let’s celebrate each other’s successes and help each other grow.  Are you in charge of planning/organizing an event? Do you lead a class of students or a team of players? Wouldn’t it be great if you could create a mobile app that would help you put information about your event or group in people's hands’ (literally)? With Yapp, you can! Yapp is an awesome, web-based service that allows you to easily create your very own mobile app for iPhone or Android. And you can do it in minutes. Yes, minutes. No coding experience necessary. No complicated software to download. No headaches. Oh, and it’s free! Simply go to www.yapp.us and sign up for a free account. Then use the simplistic templates and themes to create your app. The user interface is incredibly easy to use. Try it. You’ll see. You can include basic information, a schedule, pictures, videos, a Twitter feed, and more. You can even add interactivity to your app by allowing users to post text and photos to the app. If you want to get really fancy, you can even send user-created posts as push notifications. Seriously, Yapp is awesome. Once you’re done creating your app, you simply invite people to download it by sending them a URL to open on their mobile phone (or you can have them scan a QR code). This prompts users to download the free Yapp app (available for both iOS and Android). Once the Yapp app is installed on a user’s phone, your app can be viewed within the main Yapp app. There are so many possibilities for using Yapp. If you’re a classroom teacher, you could create an app for your class(es). If you’re a coach, you could create an app for your team with schedules, game information, etc. Yapp’s website lists possible uses like weddings, conferences, book clubs, reunions, and fundraisers. I am a co-organizer of EdCamp Murrieta, and after recently discovering Yapp, I created an app for the event, start to finish, in about 30 minutes. It’s that easy. You can download our app by going to http://my.yapp.us/LVULN9 on your mobile phone or by scanning the QR code below. As Yapp’s motto says, “If you can type and tap, you can Yapp.” Give it a try. If you create an app using Yapp, leave the link in the comments section, as I’d love to see what you create.
 UPDATE: Two days after writing this blog post, it was announced that unfortunately, Bump would be shut down effective January 31, 2014. More information can be found at here. There are a ton of great productivity apps out there, and in this post I want to tell you about Bump, one of my favorites. Recently acquired by Google, it's free and is available for both iPhone and Android. There are two main things Bump can do for you. First, it enables you to instantly transfer items from your phone (your contact information, other contacts, pictures, videos, and documents) to a friend’s phone. Once the Bump app is installed on both phones, you and your friend simply open the app on each of your phones, select what you want to share with your friend’s phone, and gently “bump” the phones together (they don’t even have to touch – you just simulate a bumping motion near the other phone). That’s it! You both simply tap the “Connect” button that will appear on your phone’s screen, and your contact, picture, or file is instantly transferred to your friend’s phone (or vice versa). Oh, and it’s cross-platform, meaning it works iPhone to iPhone, Android to Android, iPhone to Android, and Android to iPhone. But it's the second feature of Bump that, in my opinion, makes this app an absolute must-have. In addition to sharing pictures with a friend's phone, you can also go to www.bu.mp and use your phone’s Bump app to transfer photos from your phone to your computer by simply bumping your phone on the space bar. No more having to email yourself photos from your phone in order to get them onto your computer! As a principal, I frequently use my phone to snap pictures of things around campus (e.g. a picture for the school website, great student artwork, a photo of an area on campus that needs repair), so using Bump in this way is a huge time saver when I need to get pictures from my phone to my computer. Watch the short video below to see how this feature works. If you're like me and use your phone to take pictures, I highly encourage you to check out Bump to make transferring those pictures to your computer a snap (a bump actually). Again, the app is free and available for both iPhone and Android. You can go to your phone’s app store to download the app or follow the links below:
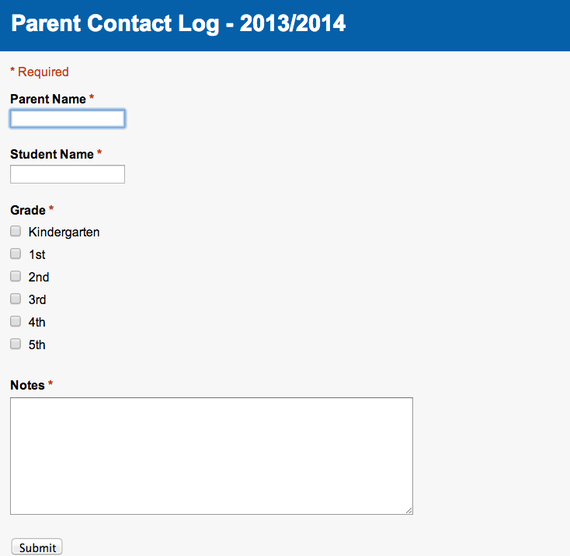
iPhone – https://itunes.apple.com/app/bump/id305479724?mt=8 Android – https://play.google.com/store/apps/details?id=com.bumptech.bumpga  If you've read my blog before, you know I'm a big fan of Google Forms. In this post, I want to share how I'm using this powerful tool to help me be more productive in the area of parent communication. This year, I have created a Google Form that I use as a Parent Contact Log. Each time I speak with a parent about a student or school-related issue, whether initiated by me or the parent, I document our conversation with this online form. The fields in my form include the date, parent's name, student's name, and a section for brief notes about our conversation (the form automatically time stamps each entry, but I manually enter the date of the conversation in case I make the entry at a later time). What I love about this form is that entries are automatically populated in a Google spreadsheet attached to the form. I could document these conversations in an old-school notebook, but by having all the entries in a spreadsheet, I can then sort conversations by parent, student, or date. I speak with a lot of parents, so having an easy-to-reference log of these conversations is extremely helpful. Below is a screenshot of the form I use. Whether you're a teacher or administrator, you know that speaking with parents is a common part of the job. If you're not already doing so, give Google Forms a try and see how they can help you be more productive. If you're not sure how to create a Google Form, you can easily learn how by watching my Google Forms tutorial videos.
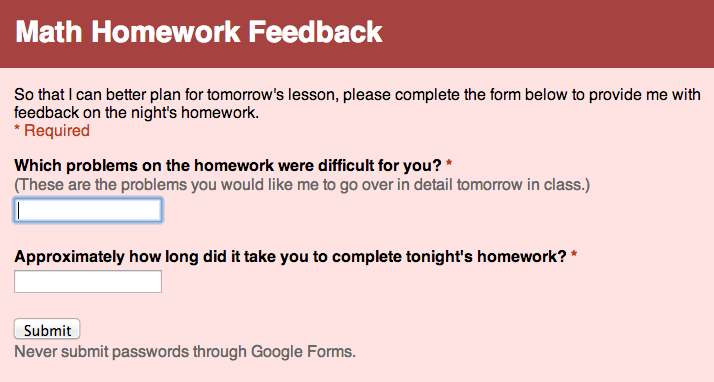
 By now, most in education have heard of “flipping” the classroom, the concept of the teacher creating instructional videos that students watch at home, freeing up time in class for deeper learning opportunities or reteaching. For example, if students in a science class watch a teacher-created video at home that introduces a scientific concept, the teacher can then use class time the next day to engage students in a hands-on lab that makes the concept come to life. I think this in an amazing idea that is transforming classrooms all over the world, but what about those teachers who aren’t quite ready to jump into the flipping pool? What about those who don’t have the time, equipment, or expertise to create all the videos required to flip their classrooms? What about those who like the idea of flipping but need to take baby steps? One of the key aspects of flipping is that it opens up time during class that, if used effectively, can increase student learning. What if teachers could gather feedback from their students on a homework assignment, before class the next day, finding out which parts of the assignment gave the students difficulty? This would enable teachers to design lessons that focus on what the students really need, rather than what teachers think the students need. Is this possible? Can teachers really get this type of information that would enable them to tailor their lessons to students’ needs? Through the magic of Google Forms, the answer is "yes." By creating and posting on their classroom website a simple Google Form like the one shown below, teachers can quickly and easily find out how their students fared on a particular assignment and plan the next day’s lesson accordingly. The procedure might look something like this. The teacher creates and posts on his/her website a Google Form asking students to give feedback on the night’s homework assignment. Students fill out the form (which would take less than a minute) and responses are collected in a spreadsheet for the teacher to view. If, for example, the majority of students indicated they had difficulty with #’s 5 and 13, the teacher then knows to devote time the next day to going over those particular problems, and not necessarily on ones students didn’t have trouble with. Or, perhaps the class grasped the entire lesson quite well, when the teacher anticipated spending a lot of time the next day reviewing the lesson. No more guessing or spending time on problems the students already “get.” Plus, by using Google Forms in this way, students are able to communicate with their teacher anonymously, eliminating potential embarrassment by having to raise their hand in class to say, “I didn’t understand how to do this problem.”
So, if you’re looking for an easy way to more effectively use your class time to maximize student learning, but you aren’t quite ready for flipping, give Google Forms a try. Thanks to Shannon Augustin, who has successfully been using Forms with her students, for sharing this amazing idea with me. If you’re not familiar with how to create a Google Form, be sure to check out my Google Forms Tutorial Videos. Enjoy! |
About BrentBrent has worked in the field of education as a teacher and administrator for 28 years. A former elementary school teacher and principal, he is currently Coordinator of Elementary Education in the Murrieta Valley Unified School District in Southern California. Read more about Brent here. Brent on X (Twitter)Archives
May 2024
Categories
All
|
Photos from somegeekintn, woodleywonderworks, Joybot, British Council Singapore, jseliger2, berkuspic, toddwendy, Alexandra E Rust, skippyjon, crdotx, tharrin, roybuloy, .FuturePresent., Just some dust, frankpierson, Jair Alcon Photography, Luigi Mengato, Muffet, stevendepolo, Pilar Soro, Sander van der Wel, jblyberg, jonathangarcia, DraXus, angeloangelo, Sthetic



 RSS Feed
